Every custom six-pack carrier begins with a dieline, and the dieline begins with the container it has to hold. Before you touch a logo or pick a board, you need the exact height and diameter of the can or bottle going inside, because a carrier cut a few millimeters too tight will scuff labels and jam on the packing line, while one cut too loose lets cans rattle and shift on the shelf. This walkthrough covers how those container numbers turn into a print-ready file, what the common formats measure, and where the tolerances that make or break a run actually live.
The short version: measure the container, add clearance, choose the style and board that carry the weight, then lay out artwork against the supplied dieline rather than a rectangle you drew yourself.
Start with the container, not the carrier
The four beverage formats you will meet most often have dimensions that are close to standardized across North American fillers, and they are worth committing to memory. A standard 12 oz can measures about 4.83 inches tall and 2.6 inches in diameter (roughly 122.7 mm by 66 mm). A 16 oz tallboy shares that 2.6-inch diameter but climbs to about 6.13 inches. The 12 oz slim or sleek can narrows to roughly 2.28 inches across and stretches taller, in the neighborhood of 5.7 inches, though slim-can heights vary enough between suppliers that you should treat that figure as indicative and confirm it. The classic 12 oz longneck bottle is the outlier: around 2.4 inches at the body but a full 9.09 inches tall, which changes the carrier from a shallow tray into a tall basket.
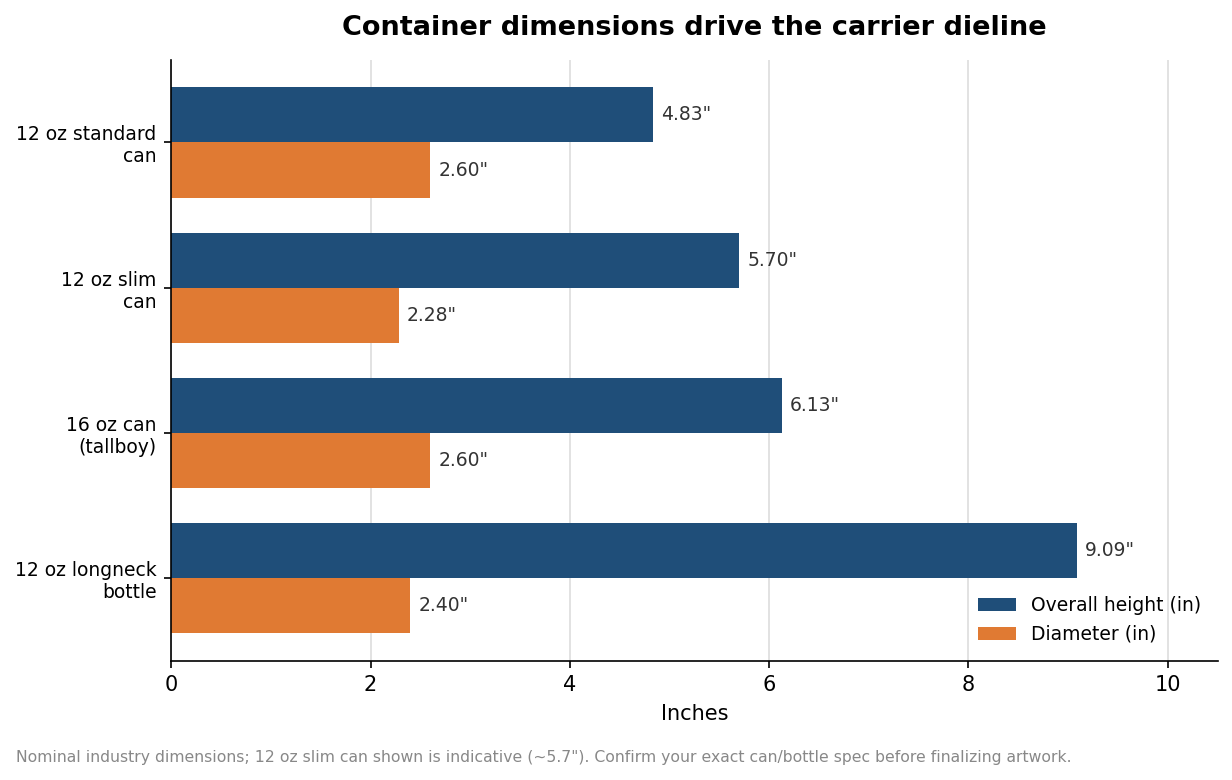
The reason this matters is that the carrier’s interior cells, handle height, and panel proportions all scale off these numbers. A wrap-around meant for 2.6-inch standard cans will not close cleanly around 2.28-inch slims, and a basket sized for longnecks towers over cans. Mixing formats in one SKU is possible, but it means designing to the largest container and accepting looser fit on the rest.
Turn container size into carrier geometry
A carrier is not built to the container’s exact dimensions; it is built to those dimensions plus clearance. As a working rule, cell openings and interior widths carry a small allowance over the nominal diameter so the container drops in without forcing, typically on the order of a couple of millimeters per cell, distributed across the pack. Too little and the line operator fights every case; too much and the pack loses the snug, squared-off look that reads as quality on a shelf. Your printer sets the exact figure based on their tooling and your container, so the practical move is to hand them the real container, or its precise spec sheet, rather than a rounded number.
Height clearance follows the same logic. A wrap-around carrier’s top and bottom panels need to clear the can’s chime and lid without bowing, and a basket’s center partition has to sit low enough that bottles seat fully but high enough to keep them from knocking. These are dieline decisions, not artwork decisions, which is exactly why you want the structural template locked before design begins.
Match board caliper to the style you choose
Carrier styles fall into a few families, and each pulls on the board differently. A wrap-around can carrier encloses the pack on most sides and prints beautifully across every panel, and it typically runs on board in the 18 to 24 point range (a point being one thousandth of an inch). A top-clip carrier grips the top of the cans and uses less material, usually landing around 20 to 24 point. A basket bottle carrier, with its open top and load-bearing handle, needs more rigidity and trends heavier, commonly 24 point and up toward 30. Treat these as indicative ranges for coated solid bleached sulfate or coated recycled board; the exact caliper depends on your printer’s stock, whether any flute is added for strength, and how far the pack has to travel.
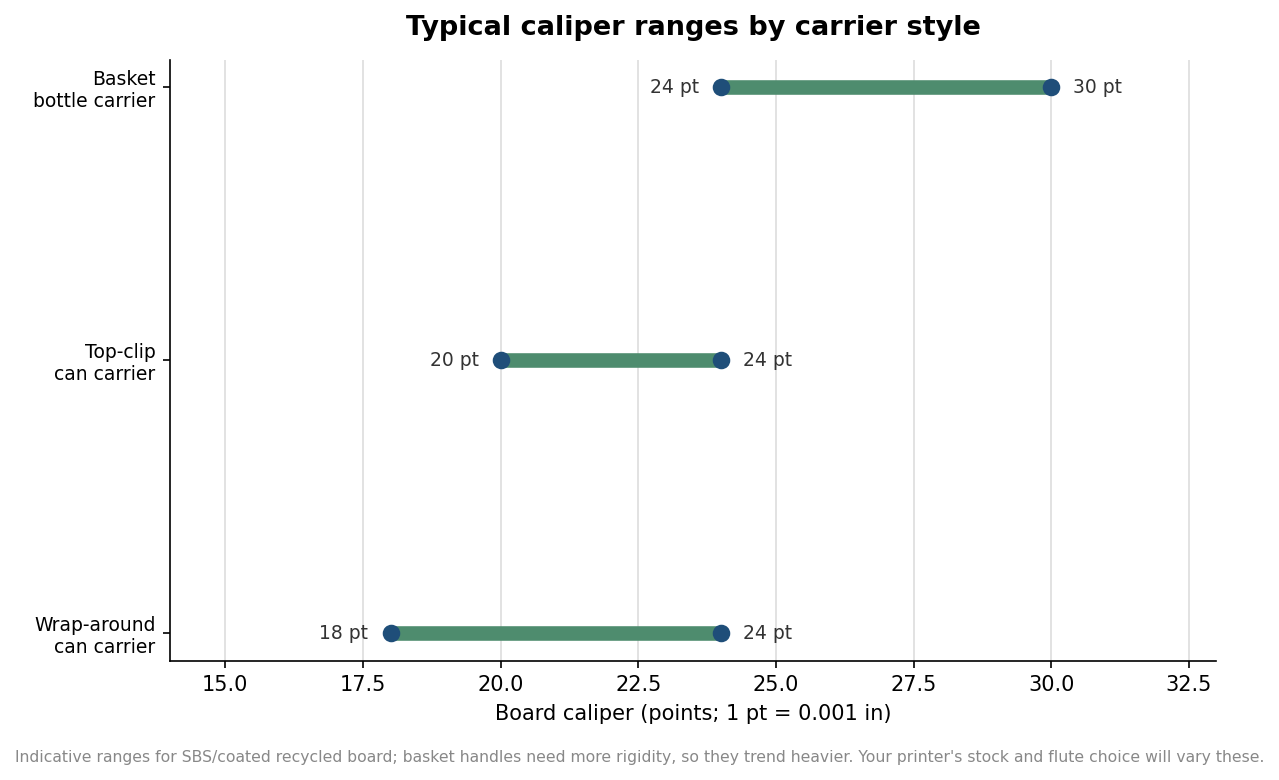
Weight is the deciding factor buyers most often underestimate. Six full 12 oz cans run over four and a half pounds, and six longnecks with beer weigh more; that load hangs from a die-cut handle every time someone lifts the pack. Underspecify the board to shave a fraction of a cent per unit and you risk handle tears and blowouts that cost far more in reputation than the savings. When in doubt, ask for a physical sample carried at full weight before you commit to a production quantity.
Set up the artwork file the printer can actually use
Once the structure is settled, the file itself has a handful of non-negotiables. Design on the supplied dieline as a separate, clearly named layer, and keep that layer free of printing artwork so it can be removed for platemaking. Extend any color or image that runs to the edge of a panel into the bleed, generally 0.125 inch past the trim, so a slight shift on the cutter never exposes a white sliver at a fold. Pull important text and logos into a safety margin away from folds and the die-cut handle, because scores and cuts distort artwork that sits right on them.
Build art at full size at 300 dpi or as vector, set it in CMYK unless you are running specific spot or Pantone inks, and remember that folds interrupt a design in ways a flat proof will not show. A logo that looks centered on screen can land across a score line once the carrier is assembled, so study the folded 3D mockup, not just the flat sheet. If your brand color is doing heavy lifting, ask whether it should be a spot ink for consistency across runs rather than a CMYK build that can drift.
What to hand your printer
The fastest path to a clean first proof is to give the printer three things: the exact container spec or a physical sample, the pack configuration and carrier style you want, and your artwork built to their dieline in a print-ready format with bleed and safety respected. Ask for the structural template up front rather than designing to a guessed rectangle, confirm the caliper against your shipping and shelf needs, and request a physical prototype at full weight before the full run. Get those numbers right at the dieline stage and the printing, the folding, and the shelf presentation all fall into place; get them wrong and every later step inherits the error. The dimensions above give you a grounded starting point, but the container in your hand is always the final authority.